
Your Defender is a target. Fit a Thatcham-approved GPS tracker and get it working before you need it. The fastest, most reliable route is the Lrd-track DEFEND-Plus — it combines live GPS tracking, remote immobilisation, motion alerts, and 24/7 monitoring in a single hardwired unit that satisfies most insurer requirements. If your policy specifically calls for a Thatcham S7 or S5 classification, the Lrd-track S7 Classic Defender Tracker or S5 Car Tracker cover those grades. Book a professional UK-wide fit if you want covert placement and Thatcham paperwork handled for you. If you are mechanically confident, the hardwired DIY sequence below will get you operational.
Your immediate next step: visit the Lrd-track product finder, pick the model that fits your budget and insurance grade, then either book installation or gather your tools and the wiring diagram before you start.
Pro Tip: Check your insurance policy wording before you buy. Some insurers require a specific Thatcham grade (S5 or S7) by name — not just “a tracker.” Confirming this before purchase saves you fitting the wrong device.
Key takeaways
A Thatcham-approved, hardwired, monitored tracker is the most effective single step a Defender owner can take to protect their vehicle and satisfy insurer requirements.
| Point | Details |
|---|---|
| Choose the right grade | Match your tracker to your insurer’s requirement: S7, S5, or DEFEND-Plus for full immobiliser features. |
| Hardwired beats magnetic | Only a hardwired permanent fit meets Thatcham standards and supports remote immobilisation. |
| Subscription is mandatory | Live tracking, app alerts, and immobilisation all require an active paid monitoring plan (DEFEND-Plus: £12/month). |
| Commission before you rely on it | Confirm GPS fix, cellular connectivity, motion alerts, and immobiliser function before considering the tracker operational. |
| Lrd-track covers all three grades | DEFEND-Plus, S7, and S5 are available with UK-wide professional installation and 24/7 monitoring. |
Table of Contents
- Which Defender tracker models suit your needs?
- Professional fit or self-install: which should you choose?
- How to hardwire a Defender tracker: step-by-step
- Advanced wiring choices and pitfalls to avoid
- SIM, data plan, subscription and app setup
- How to test your tracker after fitting
- What does a Defender tracker installation cost?
- Why Thatcham approval and 24/7 monitoring matter
- Where to hide your tracker in a Defender
- A word on professional fit versus going it alone
- Get your Defender protected with Lrd-track
- Sources
Which Defender tracker models suit your needs?
Three Lrd-track models cover the range of Defender owner requirements. Each targets a different priority, so matching the right one to your situation matters.
Lrd-track DEFEND-Plus
The DEFEND-Plus is the most capable option in the range. It includes a motion sensor, remote immobiliser, external aerial option, battery backup, and driver ID. Live tracking and the immobiliser function both require an active subscription — advertised at £12/month on the product page. This is the model to choose if you want the fullest layer of protection and your insurer accepts Thatcham-approved devices without specifying a grade.
Lrd-track S7 Classic Defender Tracker
The S7 carries Thatcham S7 classification, which is the grade most commonly named in insurance policies for high-value vehicles. It supports live tracking, motion and tow alerts, and 24/7 monitoring. If your insurer’s schedule of requirements lists “S7,” this is the correct device.
Lrd-track S5 Car Tracker
The S5 holds Thatcham S5 approval and adds driver ID recognition to the monitoring feature set. Driver ID means the monitoring centre can distinguish between the registered driver and an unauthorised user — a meaningful extra layer when your Defender is used by more than one person.
Pro Tip: All three models require an active subscription to deliver live tracking and remote immobilisation. A device that is powered but not subscribed will not ping your app or alert the monitoring centre.
Professional fit or self-install: which should you choose?
This is the decision that shapes everything else. Get it wrong and you risk voiding your warranty, losing your insurance discount, or fitting a tracker a thief can find in under two minutes.
Professional installation
A professional fit means a trained installer handles concealment, wiring, and commissioning. Lrd-track offers UK-wide professional installation as an add-on at checkout. The installer provides Thatcham paperwork your insurer can verify, places the unit in a covert location a thief is unlikely to check, and confirms the device is registered and live before leaving.
Pros: covert placement, Thatcham documentation, warranty intact, monitoring setup confirmed on the day. Cons: additional cost, requires scheduling.
Self-install: magnetic vs hardwired
A magnetic or bolt-on unit is quick to fit and removable, but it is also easy to find and easy to remove. It will not support a fuel-cut or starter interrupt, and most insurers will not accept it as a Thatcham-compliant fit.
A hardwired permanent installation is what Thatcham approval requires. It connects to constant power, a switched ignition feed, and earth, with an optional relay for the immobiliser circuit. Done correctly, it is tamper-resistant and insurance-compliant.
Choose a professional fit when:
- ✅ Your insurer requires Thatcham paperwork
- ✅ You want covert placement without guesswork
- ✅ You need the immobiliser wired and tested safely
- ✅ You have no experience with automotive wiring
DIY is acceptable when:
- ✅ You are confident with automotive electrics
- ✅ You have the wiring diagram for your specific tracker
- ✅ You understand relay wiring and fuse ratings
- ✅ You will keep records of the fit for your insurer
Pro Tip: Even if you self-install, photograph every connection and keep the wiring diagram. Your insurer may ask for evidence of a compliant fit, and a professional-looking record carries weight.
How to hardwire a Defender tracker: step-by-step
This sequence follows the installation order described in the iTrackers DEFENDER manual and applies to hardwired GPS tracker fits on Defender chassis. Adapt wire colours to your specific tracker’s diagram.
Before you start: disconnect the battery negative terminal, gather your tools (wire strippers, crimps, multimeter, automotive fuse holders, heat-shrink), and have the tracker’s wiring diagram open in front of you.
- Locate a constant power source. Run a fused wire (appropriate fuse rating per your tracker’s manual) from the battery positive terminal or a fused constant live in the fusebox. This keeps the tracker powered even when the ignition is off.
- Find a switched ignition feed. Connect the ignition input wire to a circuit that goes live only when the key is on. This tells the tracker when the vehicle is in use.
- Connect the earth. Run a short earth wire to a clean chassis bolt or body earth point. A poor earth is one of the most common causes of intermittent tracker faults.
- Wire the immobiliser relay (if applicable). For a fuel-cut or starter interrupt, wire the relay coil to the tracker’s output and the relay’s normally closed contacts into the fuel pump or starter circuit. See the relay wiring note in the advanced section below before finalising this step.
- Route the external aerial. Run the aerial cable to a higher, unobstructed location — behind the windscreen top seal, under the roof lining, or near the A-pillar. Keep it away from metal obstructions and the main unit.
- Conceal the main unit. Place it in a dash void, behind a bulkhead panel, or in a chassis section that is not immediately visible. Secure it with the supplied mount or self-tapping screws.
- Reconnect the battery. Check for any blown fuses before powering up.
- Commission the device. Register on the tracking platform, insert or activate the SIM/data plan, download the app, and run the tests described in the commissioning section below.
Pro Tip: Always fuse the constant power feed as close to the battery as possible. An unfused constant live is a fire risk if the wire chafes against the chassis.
Advanced wiring choices and pitfalls to avoid
The relay is where most self-installs go wrong. Forum experience from Defender owners confirms that some relays supplied with trackers are rated for intermittent switching only. If your immobiliser circuit requires the relay coil to remain energised for extended periods — which is common when the fuel pump is interrupted while the vehicle is parked — a standard relay can overheat or fail prematurely.
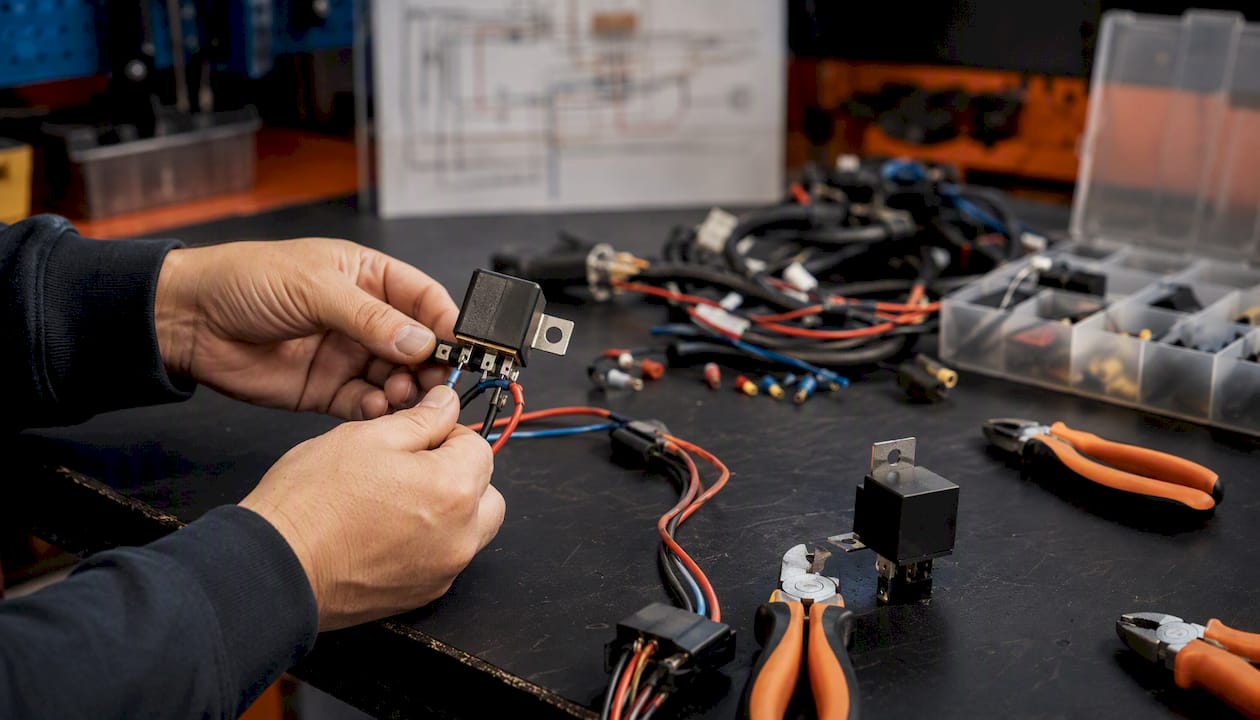
The fix is straightforward: use a changeover relay rated for continuous duty, or a DC solid-state relay designed for switched DC loads. Both handle sustained activation without degrading. This is not a theoretical concern; installers and owners on Defender forums have reported relay failures traced directly to using the supplied unit in a continuous-duty application.
Common pitfalls:
- ❌ Wiring the constant power feed to a non-constant circuit (it will lose power when the ignition is off)
- ❌ Using the wrong fuse rating — always match the tracker manual’s specification
- ❌ Leaving the tracker in an obvious location (glovebox, under the seat, taped to the fusebox)
- ❌ Failing to register the device with the monitoring provider after fitting
- ❌ Not testing the immobiliser in a safe, controlled environment before relying on it
Practical mitigations:
- ✅ Fit a small hidden bypass switch in the immobiliser circuit so you can restart the vehicle manually during testing without disabling the tracker
- ✅ Use an indicator LED during bench testing to confirm relay switching before final mounting
- ✅ Mount the aerial clear of metal panels and at least 30cm from the main unit
- ✅ Test relay behaviour with a multimeter before closing up the dash
Pro Tip: A hidden bypass switch is not a security weakness — it is a safety measure. Wire it in a location only you know, and remove or disable it once testing is complete.
SIM, data plan, subscription and app setup
A powered tracker that is not subscribed is a passive box. Live tracking, app alerts, and remote immobilisation all depend on an active data connection and a paid monitoring plan.
The iTrackers DEFENDER manual sets out the correct activation order: provision the data plan first, complete the physical installation, then create the web account and download the app. Reversing this order — fitting the hardware before the SIM is active — means you cannot confirm the device is reporting during commissioning.
Activation checklist:
- Order your data plan or confirm the SIM is provisioned (LTE/Cat-M1 or 4G depending on your model).
- Confirm network coverage in the areas where your Defender is regularly parked.
- Note the device IMEI and SIM number — you will need both for account registration.
- Create your account on the tracking web portal.
- Add vehicle details and pair the mobile app.
- Set geofence boundaries and configure motion/tow alert thresholds.
- Confirm the Stolen Vehicle Tracking Centre linkage is active — the Land Rover Secure Tracker page illustrates how this monitoring centre link works for OEM systems; the principle is identical for aftermarket monitored trackers.
Pro Tip: Do not skip the geofence setup. A correctly configured geofence means you get an alert the moment your Defender moves without authorisation — not after it has already left your postcode.
How to test your tracker after fitting
Commissioning is not optional. A tracker that is fitted but not verified is no more useful than one still in the box.
Commissioning sequence:
- Power on and confirm the LED or app status shows the device is live.
- Check GPS fix — take the vehicle to open ground with a clear sky view if the initial fix is slow.
- Confirm cellular connectivity — the app should show a live location within a few minutes of powering up.
- Generate a motion alert by rocking the vehicle gently and confirming the alert appears in the app.
- Test the tow alert if your model supports it.
- Test the immobiliser in a safe, private location — engine running, apply the immobiliser command via the app, confirm the engine stops or the starter is interrupted as expected.
- Confirm the monitoring centre can see the device on their platform.
Troubleshooting common problems:
- No GPS fix: move to open sky, check aerial routing, confirm the aerial is not pinched or shorted against metal.
- No cellular signal: confirm SIM is activated, check APN settings in the tracker configuration, verify network coverage at your location.
- Power drain: check the constant feed is truly constant and not drawing excessive current; measure parasitic draw with a multimeter.
- False motion alerts: adjust sensor sensitivity in the app settings; check the vehicle is on level ground.
When to call the installer or monitoring centre: repeated GPS dropouts after aerial repositioning, suspected tamper, immobiliser not responding to app commands, or failure to appear on the monitoring platform after 24 hours.
Pro Tip: Run the immobiliser test with the vehicle stationary and in a private space. Never test it on a public road or with passengers on board.
What does a Defender tracker installation cost?
Costs split into three components: the device, the installation, and the ongoing subscription.
Device price: Lrd-track models span a range from the S5 entry point through to the DEFEND-Plus with full immobiliser features. Prices vary by model and are listed on the Lrd-track product pages.
Professional installation: Lrd-track offers UK-wide professional installation as a paid add-on. A professional fit is typically completed same-day or within 48 hours of booking, depending on installer availability in your area.
Subscription: Live tracking and remote immobilisation require an active monitoring plan. The DEFEND-Plus subscription is advertised at £12/month. S5 and S7 plans are listed separately on their respective product pages.
Additional costs to budget for:
- ✅ Relay parts if upgrading to a continuous-duty unit (typically a few pounds from an automotive supplier)
- ✅ Wiring consumables: fuse holders, crimps, heat-shrink
- ✅ Any insurance administration fee your insurer charges to record a Thatcham-approved fit
- ✅ MOT advisory check if wiring modifications affect any safety-critical circuit
Pro Tip: Factor the subscription into your total cost of ownership from day one. A £12/month plan over three years adds up — but compare that against the excess and inconvenience of losing a Defender to theft.
Why Thatcham approval and 24/7 monitoring matter
Thatcham S7 and S5 classifications are not marketing labels. They are the standards insurers and recovery centres use to determine whether a tracker qualifies for a policy discount and whether the monitoring centre can initiate a police-liaison recovery protocol.
An S7-rated device tells your insurer the tracker has been independently tested to a defined specification. An S5 device adds driver ID to that standard. Without one of these grades, many high-value vehicle policies will not recognise the tracker at all.
The Land Rover Secure Tracker requires an active subscription to enable remote services and Stolen Vehicle Tracking Centre linkage — the same principle applies to any monitored aftermarket tracker. A device without an active plan is a passive recorder, not a recovery asset.
The difference between a monitored and an unmonitored tracker shows up at the worst possible moment. A monitored system with 24/7 centre support means an operator can contact police with a live location the moment your Defender moves without authorisation. A passive device means you check the app yourself — after you notice the vehicle is gone. Professional installers note that Defender theft has risen sharply, and that layered security — tracker, immobiliser, and concealment together — gives the best recovery odds.
Trust signals to check before you buy:
- ✅ Thatcham certification (S5 or S7 as required by your insurer)
- ✅ 24/7 monitoring availability with a named Stolen Vehicle Tracking Centre
- ✅ UK-wide professional installation service
- ✅ Warranty and customer support contact details published on the product page
Where to hide your tracker in a Defender
Placement is security. A tracker found in the first two minutes is a tracker removed in the first three.
Lrd-track’s guidance on covert placement recommends separating the main unit from the aerial: hide the unit deep in a dash void, behind a bulkhead panel, or within a chassis section, while routing the aerial to a higher, unobstructed position for reliable reception. This dual approach means a thief who locates the aerial cannot assume they have found the unit.
Defender-specific hiding spots:
- ✅ Behind the instrument binnacle or lower dash panels (accessible for wiring, hidden from view)
- ✅ Inside the bulkhead void between the engine bay and cabin
- ✅ Within the A-pillar trim (aerial routing works well here)
- ✅ Near the rear chassis cross-member (for vehicles with a secondary battery or auxiliary wiring run)
Spots thieves commonly check first: under the driver’s seat, in the glovebox, taped to the fusebox cover, and behind the rear number plate. Avoid all of these.
Quick tamper-proofing steps:
- ✅ Use the supplied security mount or self-tapping screws — do not rely on adhesive tape alone
- ✅ Conceal all connectors with heat-shrink or loom tape so they are not visible if a panel is removed
- ✅ Keep a record of the placement location for your insurer, but do not write it anywhere that travels with the vehicle
Pro Tip: Mount the aerial behind the windscreen top seal or under the roof lining. This gives a clear sky view for GPS and a cellular signal path, even if the main unit is buried in the bulkhead.
A word on professional fit versus going it alone
For most Defender owners, a professional installation is the right call. Not because the wiring is beyond a competent DIYer — it is not — but because the stakes are high enough that the margin for error is very small. A covert placement done by someone who installs trackers every week will be harder to find than one done once by someone following a diagram. The Thatcham paperwork is handled. The monitoring centre link is confirmed. You drive away knowing it works.
DIY makes sense if you are genuinely comfortable with automotive electrics, you have the time to do it properly, and you are prepared to keep thorough records. The relay selection issue alone — choosing the right continuous-duty unit for an immobiliser circuit — is the kind of detail that catches people out. If you are in any doubt, the professional fit is the better investment.
Get your Defender protected with Lrd-track
Your Defender deserves more than a basic tracker. Lrd-track offers three Thatcham-approved models — the DEFEND-Plus, S7, and S5 — each engineered specifically for Land Rover vehicles, with UK-wide professional installation available at checkout and 24/7 monitoring included in the subscription.
The purchase flow is straightforward: choose your model on the Lrd-track product finder, add professional installation if you want a covert fit with Thatcham paperwork, and activate your subscription on the day of fitting. Most professional installations are completed same-day or within 48 hours of booking. Your tracker is live, your monitoring centre is linked, and your insurer has the documentation they need.
Visit Lrd-track to compare models, check installation availability in your area, and get your Defender protected.
Sources
These pages are worth bookmarking before you start your installation or activation.
- Protect Your Vehicle with Our Secure Tracker
- iTrackers - DEFENDER manual (installation steps and tips)
- Fitting GPS tracker to Defender (forum discussion)
- LR Defender Scorpion Tracker Installation - Alpine Restorations Automotive
Pro Tip: Download and read the full installation manual for your specific tracker model before you buy any wiring components. Connector types, fuse ratings, and relay specifications vary between models — buying parts blind wastes time and money.