
The most effective hidden tracker placements are behind dashboard trim, inside the spare-tyre well, along the underside of the chassis near the rear bumper, and within wheel-well liners. Each of these locations balances concealment with reliable signal reception — but none of them works without a live signal test before you seal everything in place.
Two things to keep in front of mind before you pick a spot:
- Technical: Metal enclosures block GPS and GSM signals. A tracker buried deep inside a steel chassis rail or wrapped in thick bodywork will lose contact. You need at least a thin layer of plastic, glass, or fabric between the device and the sky. Power source matters too: battery units suit short-term covert use; hardwired units are the right choice for long-term, insurance-approved installations.
- Legal/ethical: In the UK, you may track your own vehicle. Placing a tracker on a vehicle you do not own without the owner’s knowledge raises serious privacy concerns and can carry criminal or civil consequences. If you are unsure, speak to a solicitor or contact your local police.
TL;DR: Always run a live location test from your chosen spot before committing. For Thatcham-approved, insurance-compliant installations, professional fitting is strongly recommended.
Table of Contents
- The best internal hiding spots for a GPS tracker
- Where to hide a tracker on the outside of your vehicle
- How to choose the right spot for your tracker
- Step-by-step installation: how to fit a hidden tracker safely
- How to detect a hidden tracker on your vehicle
- When professional installation is the right choice
- Key takeaways
- The spot that most owners get wrong
- Lrd-track: Thatcham-approved trackers fitted to your Land Rover
- Useful sources
The best internal hiding spots for a GPS tracker
Internal placements keep the device away from road debris, water, and a quick visual sweep of the exterior. Behind dashboard trim, inside the spare-tyre well, and in door-panel cavities consistently offer the best balance of concealment and signal access. Here is how each one stacks up.
Behind dashboard trim
The dashboard area is one of the most popular covert tracking device locations because it requires trim removal to access and sits close to the windscreen, giving the GPS antenna a clear view of the sky. On a Land Rover Defender or Discovery, the lower A-pillar trim and the area behind the instrument cluster both offer usable cavities. A hardwired unit can tap into a switched ignition feed here, eliminating battery concerns entirely.
The main risk is heat. Dashboard areas can reach high temperatures in summer, so check your device’s operating temperature range before committing.
Under the seats
The underside of a front or rear seat is quick to access for servicing but reasonably discreet in day-to-day use. A magnetic or battery-powered unit can sit on the seat rail without any permanent fixing. Signal quality is generally good because the floor and seat foam are not thick enough to cause meaningful attenuation.
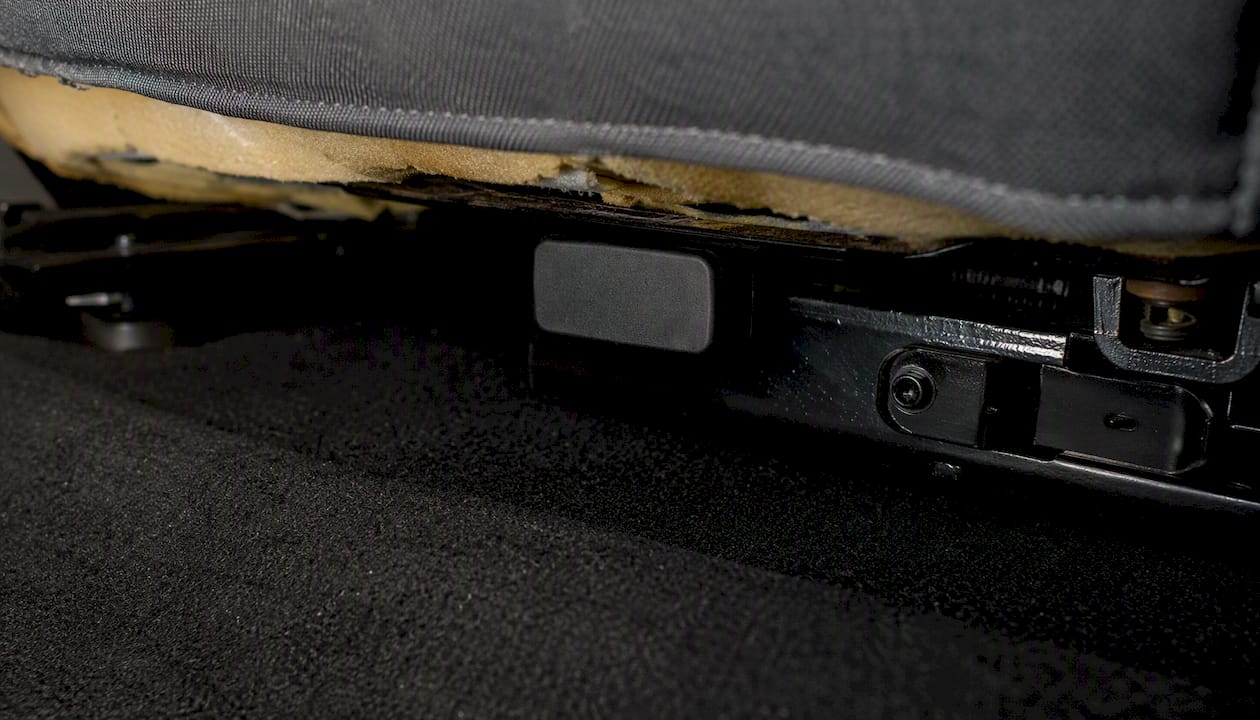
The downside: anyone who checks under the seats during a valet or service will spot it immediately. Reserve this spot for short-term deployments or as a secondary backup unit.
Glovebox and centre console cavities
Both locations offer enclosed spaces that are rarely inspected by anyone other than the driver. The centre console on a Range Rover, for example, often has a void beneath the armrest that is large enough for a compact tracker. Hardwiring is straightforward here because 12V accessory feeds run nearby.
One caution: these are opened regularly by the driver and passengers. If concealment from the vehicle’s own occupants is not a concern, this works well. If it is, choose somewhere less accessible.
Spare-tyre well and boot area
The spare-tyre well is one of the most underused and effective spots. It is rarely opened, sits at the rear of the vehicle away from the engine bay’s heat and interference, and the plastic boot lining provides minimal signal obstruction. A battery-powered unit placed here can operate for weeks without attention.
The parcel shelf cavity, where the trim meets the rear window, is another option. Signal reception is excellent given the proximity to glass, and the location is not obvious during a casual inspection.
OBD-II port: easy but exposed
Plugging a tracker directly into the OBD-II port (usually located beneath the steering column) takes under a minute and requires no tools. That convenience is also its biggest weakness. Any mechanic, valet, or car thief who knows what they are looking for will spot a device there immediately. Some insurers also take a dim view of OBD-II trackers for approved installations because the device can be unplugged in seconds.
Use an OBD-II tracker for temporary monitoring or fleet diagnostics, not as your primary covert unit.
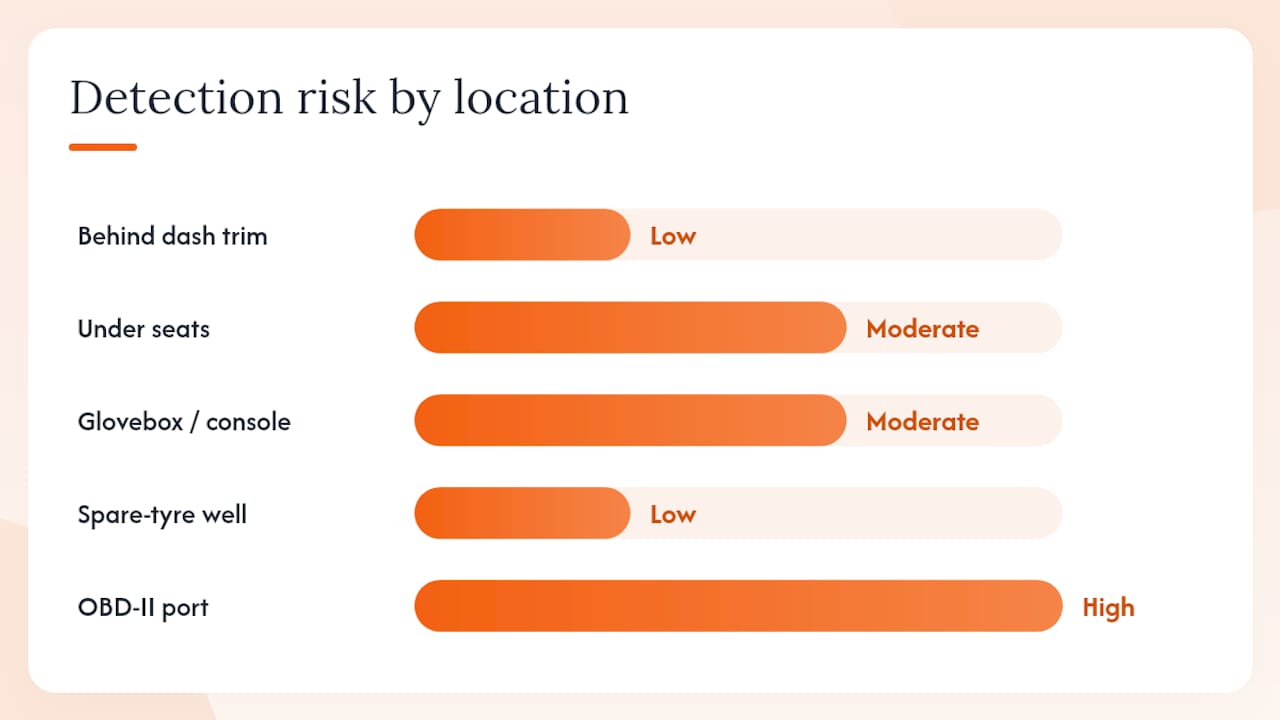
Internal hiding spots at a glance:
| Location | Stealth / detection risk | GPS/GSM signal | Power availability | Ease of service | Exposure / durability |
|---|---|---|---|---|---|
| Behind dashboard trim | Low risk (tools needed) | Excellent (near glass) | Hardwire easy | Moderate | Heat risk in summer |
| Under seats | Moderate risk | Good | Battery or hardwire | Easy | Low exposure |
| Glovebox / console | Moderate risk | Good | Hardwire easy | Easy | Low exposure |
| Spare-tyre well | Low risk | Good (plastic liner) | Battery preferred | Easy | Low exposure |
| OBD-II port | High risk (visible) | Good | Permanent power | Very easy | Low exposure |
Where to hide a tracker on the outside of your vehicle
External placements suit hardwired fleet units, long-term installations on vehicles with complex interior trim, and situations where interior access is impractical. Wheel-well liners, under-bumper chassis mounts, and behind bumper covers are the go-to options, but each demands proper weatherproofing.
Undercarriage and chassis mounts
A magnetic or bolt-on mount fixed to a flat section of the chassis, away from the exhaust and drivetrain, keeps the device completely out of sight. On a Land Rover with a ladder-frame chassis, there are several suitable flat surfaces toward the rear. The device sits low, which slightly reduces sky-view for GPS, but modern trackers with sensitive chipsets handle this well.
Clearance is critical. Ensure the device clears the ground sufficiently to avoid being struck by road debris at speed. Use a sealed mounting box rated to at least IP67 for this location.
Behind bumper covers
The cavities behind front and rear bumper covers are dry, relatively protected from direct road spray, and invisible without removing the bumper. A compact tracker fixed to the inner bumper structure with automotive-grade double-sided tape or a bolt-on bracket sits here without any visible sign from outside.
Check for heat proximity to the front bumper if the tracker sits near the radiator. Rear bumper cavities are generally cooler and more suitable.
Wheel-well liners
Wheel-well liners are a popular choice for magnetic trackers because they are quick to access for battery swaps and the plastic liner does not block signal. The risk is road grime, water, and stone chips. A tracker placed here without a protective enclosure will degrade quickly. Wrap it in a waterproof pouch or use a purpose-built magnetic case rated for external use.
Also worth noting: wheel wells are one of the first places a professional sweep will check. If counter-surveillance is a concern, this is not your most discreet option.
Brake-light housings
Some installers use the cavity behind a rear brake-light cluster, accessible by removing the light unit from inside the boot. Signal reception is good through the plastic lens, and the location is genuinely obscure. The limitation is space: most brake-light cavities are tight, and heat from the bulbs (or LED driver circuits) can stress a tracker over time. Confirm the device’s thermal tolerance before using this spot.
Pro Tip: For any external placement, choose an enclosure rated to at least IP67 and use stainless-steel fixings or a neodymium magnetic mount rated for motorway speeds. A device that vibrates loose at 70mph is worse than no device at all.
How to choose the right spot for your tracker
Picking the best place to hide a car tracker comes down to three overlapping checklists: signal, power, and serviceability. Get all three right and your installation will be reliable for years.
Signal checklist
- Avoid placing the tracker inside a thick steel enclosure or directly against the chassis floor without any plastic or fabric between it and the sky.
- GPS and GSM signals need at least a thin non-metallic layer for reliable reception; plastic bumpers, glass, and fabric headliners all work.
- Orient the device so its antenna faces upward or toward the windscreen where possible.
- Avoid the engine bay: heat, vibration, and electromagnetic interference from the alternator all degrade performance.
- Run a live location test from the chosen spot using your tracker’s companion app before finalising the install.
Power checklist
- Battery units are suitable for covert short-term use or secondary backup placements, with varying battery life depending on reporting frequency.
- Hardwired units: connect to a switched ignition feed or a permanent live with an inline fuse; required for most Thatcham-approved, insurance-compliant installations.
- OBD-II units: permanent power but easily removed; not suitable as a primary covert unit.
- Always fit an inline blade fuse (typically 1A–3A) on any hardwired installation to protect the vehicle’s electrical system.
Serviceability checklist
How often will you need to access the device for charging, firmware updates, or SIM swaps? A spot that requires 45 minutes of trim removal every three weeks is not practical. Match access frequency to the location:
- Battery units needing regular charging: under seats, spare-tyre well, or wheel-well liner.
- Hardwired units needing occasional firmware access: behind dashboard trim or centre console.
- Set-and-forget hardwired units: chassis mounts, behind bumpers, brake-light housings.
Insurance and Thatcham factors
If your insurer requires a Thatcham-approved tracker, the placement itself must meet the installer’s specification. Thatcham Category S5 and S7 devices, for example, are designed for professional installation with secure cable routing and anti-tamper mounting. A DIY placement in the wrong location may invalidate the approval. Confirm the required fitting method with your insurer before you start.
Step-by-step installation: how to fit a hidden tracker safely
Follow this sequence whether you are fitting the unit yourself or briefing a professional fitter.
- Test before you close up. Open the companion app, confirm a live GPS fix, trigger a test alert, and verify the remote immobiliser function if fitted. Companion apps and diagnostics are the standard method for verifying signal quality and alert performance from a chosen spot.
Recommended materials: automotive double-sided tape, zip ties, adhesive Velcro strips, marine sealant, rubber grommets, split-loom conduit, heat-shrink tubing, inline blade fuse holders.
Pro Tip: Add a small loop of slack cable at each connection point — a “service loop.” If you ever need to remove or reposition the tracker, you will have enough cable to work with without cutting and re-terminating.
⚠️ Safety warning: Never interfere with airbag wiring, the steering column loom, brake lines, or fuel system components. If you are not confident working around these systems, use a professional installer.
How to detect a hidden tracker on your vehicle
Knowing how to find a covert tracking device is just as useful as knowing how to place one. If you suspect an unauthorised tracker has been fitted to your vehicle, here is how to check.
What to do if you find a suspicious device
Do not remove it immediately. Photograph it in place, note the location, and contact your local police. If the device is evidence of stalking or harassment, removing it may compromise the investigation. The police can advise on evidence preservation and next steps. This is general guidance, not legal advice; consult a solicitor for your specific situation.
Insurance and Thatcham approval
Thatcham Research certifies vehicle security products to recognised standards. A Category S5 tracker, for example, provides driver identification and monitoring; a Category S7 provides tracking and recovery. Many UK insurers require a Thatcham-approved device for a premium discount or as a condition of cover on high-value vehicles. Professional installs provide secure routing, Thatcham-compliant mounting, and activation that support insurance approval and reliable long-term monitoring.
Always confirm the required category and fitting standard with your insurer before purchasing a device. A tracker fitted in the wrong location or without professional installation may not satisfy the insurer’s requirements, even if the device itself carries Thatcham approval.
Authoritative note: If you discover an unauthorised tracker on your vehicle, or if you are considering tracking a third party’s vehicle, contact your local police or seek legal advice before taking action. The ICO’s website provides guidance on UK GDPR obligations for data controllers.
When professional installation is the right choice
DIY installation is feasible for battery-powered backup units in accessible locations. For anything that needs to satisfy an insurer, protect a high-value vehicle, or remain genuinely hidden from a determined search, professional fitting is the better call.
A professional installation typically includes:
- ✅ Thatcham-approved device selection matched to your vehicle and insurer’s requirements
- ✅ Secure cable routing through factory channels with no visible modification
- ✅ Anti-tamper mounting in a location specific to your vehicle’s architecture
- ✅ Activation, app setup, and monitoring subscription configuration
- ✅ Driver ID setup and tow-away alert configuration
- ✅ A post-install test confirming live GPS fix, alert response, and remote immobiliser function
Matching tracker type to placement and use case is something professional fitters do as a matter of course. They know which cavities in a Defender’s B-pillar or a Discovery’s rear quarter panel give the best signal without compromising concealment.
Professional installation is particularly important for:
- Insurance-approved trackers: most Thatcham S5 and S7 approvals require fitting by an authorised installer.
- High-value vehicles: Land Rovers are among the most targeted vehicles in the UK. Understanding how they are stolen makes clear why a tracker that a thief can locate and remove in minutes offers little real protection.
- Complex wiring routes: vehicles with CAN-bus systems and multiple ECUs need careful hardwiring to avoid triggering fault codes.
- Long-term fleet use: a professional install reduces the risk of a tracker failing silently due to a loose connection or a drained battery.
Pro Tip: Ask your installer to document the fitting location and cable route. If the vehicle is ever sold or the tracker needs servicing, that record saves hours of searching.
Key takeaways
The single most important rule for hidden tracker placement: concealment only works if the signal does too. Test every location live before you seal it in.
| Point | Details |
|---|---|
| Best internal spots | Behind dashboard trim and the spare-tyre well offer the best mix of concealment, signal, and durability. |
| External placements need protection | Wheel-well and chassis mounts require an IP67-rated enclosure and clearance checks before fitting. |
| Signal needs a clear path | Avoid thick metal enclosures; plastic, glass, and fabric allow GPS/GSM signals through reliably. |
| Insurance compliance requires professional fitting | Thatcham S5 and S7 approvals typically require an authorised installer; confirm with your insurer first. |
| Lrd-track for Land Rover owners | Lrd-track offers Thatcham-approved devices with professional installation, 24/7 monitoring, and driver ID for Defender, Discovery, and Range Rover models. |
The spot that most owners get wrong
Most guides focus on concealment and stop there. The placement that looks perfect on paper — deep inside a chassis rail, tucked behind a steel bracket — is often the one that fails first. Not because it gets found, but because the signal never reaches it reliably.
The real discipline in hidden tracker placement is testing under real conditions: engine running, vehicle moving, parked in a multi-storey. A location that gives a solid GPS fix on your driveway may lose contact the moment you park in an underground car park or near a large metal structure. That gap between “hidden” and “working” is where most DIY installs fall short.
There is also a consent issue that gets glossed over in most tracker guides. Fitting a device to your own Land Rover is entirely lawful and, given the theft rates for Defenders and Range Rovers in the UK, entirely sensible. But the moment you consider fitting one to a vehicle you share, lease, or do not own outright, the legal picture changes. The ICO’s guidance on employee monitoring and the Protection from Harassment Act both apply in ways that are not obvious until something goes wrong.
My honest recommendation: for any installation that needs to satisfy an insurer or protect a vehicle worth more than the cost of a professional fit, book a qualified installer. The peace of mind is not just about the tracker being hidden. It is about knowing it will actually work when you need it.
Lrd-track: Thatcham-approved trackers fitted to your Land Rover
Your Land Rover is a target. Defenders, Discoveries, and Range Rovers consistently appear among the most stolen vehicles in the UK, and thieves know exactly where to look for poorly fitted trackers.
Lrd-track supplies and professionally installs Thatcham-approved GPS trackers built specifically for Land Rover models. Every installation includes:
- ✅ Insurance-approved Thatcham S5 or S7 device matched to your model
- ✅ Professional fitting with secure, hidden cable routing
- ✅ Real-time tracking via the Lrd-track mobile app with instant theft alerts
- ✅ Remote immobilisation and driver ID
- ✅ 24/7 monitoring and UK-wide recovery support
- ✅ Tow-away and backup tracking alerts
Pair your tracker with number plate protection for a complete layer of vehicle security that covers both recovery and identity theft.
Use the Lrd-track product finder to match the right device to your Defender, Discovery, Range Rover, or Grenadier, and book your professional installation in minutes.
Useful sources
- How to Hide a GPS Tracker on Your Car, Van, or Motorcycle | Dual Action Roadside
- Best Hiding Spots for a GPS Tracker in Your Car That Thieves Won’t Check — EyeSpySupply Official Blog
- Best places to hide a GPS tracker in your car | PAJ GPS
- Where is the Best Place to Hide a GPS Tracker in a Vehicle? — UTrack Official Web
- Essential Functions for Effective Vehicle Tracking – LRD Track
- How does the LRD Track work
- How Land Rovers Are Stolen in the UK – And How a Tracker Can Help You